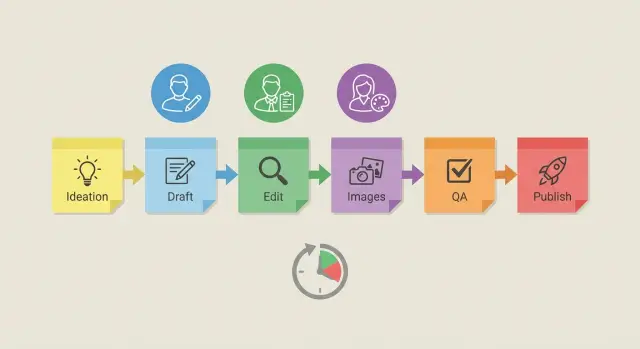
Repeatable content workflow: roles, handoffs, and SLAs
Build a repeatable content workflow with clear roles, handoffs, and SLAs so ideas move smoothly from brief to draft, edit, images, and publish.
Why teams need a repeatable workflow
Most content doesn’t fail because the idea is bad. It fails because it gets stuck between stages. Someone writes a draft, then it sits in a doc waiting for feedback. An editor asks for changes, but no one is sure who owns the next step. Images get requested late, so publishing slips again.
A repeatable content workflow means you can run the same process every time and get a predictable result. The steps are clear, handoffs are clear, and everyone knows what “done” looks like at each stage.
You’re not standardizing creativity. You’re standardizing the boring parts that cause delays and stress: who decides, how work moves forward, how long stages usually take, and what each label actually means (draft, ready for edit, ready to publish).
Keep the front of the process light. If you force too many approvals too early, people stop proposing ideas, and writers spend more time formatting than writing. Get stricter closer to publication.
The payoff is speed and quality without burnout. Writers get fewer surprise rewrites because expectations are visible. Editors focus on improving the piece, not chasing missing context. Designers get requests earlier, with the right specs.
One simple example: if the editor always receives a draft with a working title, target reader, 3 key points, and sources, edits become faster and calmer.
Roles and ownership (who does what)
A workflow holds together when ownership is clear. If everyone can edit everything, nobody is accountable, and deadlines slip.
Most teams end up with the same core roles, even if titles differ: a requester (the person with the need), a strategist (sets the angle and priority), a writer (creates the draft), an editor (improves clarity and accuracy), a designer (handles images), and a publisher (does the final release and distribution).
Decide owners and approvers per stage
For each stage, name:
- One owner who is responsible for moving it forward.
- One approver who can say “yes” or “no.”
Keep approvals small. Too many reviewers leads to vague feedback and slow cycles.
A simple way to assign responsibility:
- Ideation: strategist owns, requester approves
- Outline: writer owns, strategist approves
- Draft: writer owns, editor approves for quality
- Visuals: designer owns, editor (or brand lead) approves
- Publish: publisher owns, strategist (or requester) approves final release
When feedback conflicts, pick a single final decision maker. In most teams, that’s the strategist for topic and positioning, and the editor for readiness and clarity. Write that rule down so debates don’t stall the calendar.
If you’re a one-person team
You can keep the same structure by switching hats and using a checklist. For example:
- Monday: strategist (choose topic)
- Tuesday: writer (draft)
- Wednesday: editor (tighten and fact-check)
- Thursday: designer (create images)
- Friday: publisher (QA and post)
Even if you use generators or templates to move faster, keeping the role boundaries helps you avoid mixing “create” and “judge” in the same sitting.
Handoffs and stage definitions
Work breaks when “done” means different things to different people. The fix is to define each stage with:
- a clear input
- a clear output
- the moment it’s allowed to move forward
Stage gates: what “ready” means
Use one definition of “ready to hand off” across the team:
- The goal and audience are written in one sentence.
- The owner is named (one person, not a group).
- Required assets are listed (quotes, sources, images, product details).
- The next step and due date are set.
- The file has a version label and a short handoff note.
Now keep stage definitions short enough that people actually follow them.
An idea becomes a brief when it has a working title, angle, target reader, and 3 to 5 key points. A brief becomes a draft when it has full sections and placeholders for missing details. If something is missing, don’t write “TBD” and move on. Name an owner for the missing input.
A draft becomes “edited” when it reads clean, matches the brief, and no longer needs structural changes. Images are “ready” when they match the headline promise, meet size requirements, and include final captions or alt text.
Where feedback is allowed (and where it stops)
Feedback should be wide early and narrow late.
- During brief and first draft: open comments and big questions are allowed.
- During edit: feedback focuses on clarity, structure, and correctness.
- After copy approval: changes happen only for factual errors, legal/compliance risk, or broken formatting.
That last rule prevents endless loops.
Version labels also reduce confusion. A simple approach:
- v0.1: outline
- v0.5: first full draft
- v0.9: ready for final review
- v1.0: approved for publish
Handoff notes should be predictable. Keep them short and consistent: what changed since last version, up to 3 open questions, who needs to review (and by when), any “do not change” lines (approved claims, quotes), and any publish requirements (category, CTA placement, image style).
SLA timings that actually work
A workflow needs time promises people can keep. The best SLAs are boring: they match real capacity, include review time, and make delays visible early.
A simple SLA table (example)
| Stage | Owner | Due time | Review time |
|---|---|---|---|
| Ideation brief approved | Content lead | 1 business day | 4 hours |
| Draft delivered | Writer | 2 to 3 business days | 1 business day |
| Edit pass completed | Editor | 1 business day | 4 hours (writer fixes) |
| Image set ready (1 hero + 2 in-body) | Designer | 1 business day | 4 hours (approval) |
| Final QA + schedule/publish | Publisher | 4 hours | 2 hours (final sign-off) |
These numbers fit a weekly cadence. For a monthly cadence, you usually stretch drafting and editing, but keep approvals short so work doesn’t sit idle.
Set SLAs from capacity, not wishes. If one editor can do 6 reviews per week, that’s your ceiling. Either reduce volume, narrow scope, or add help.
Rush requests should be a policy, not a favor:
- Rush is allowed only if a lower-priority piece is paused.
- Define rush clearly (“same day” or “24 hours”) and name the approver.
- Limit rush requests per month.
- Expect tradeoffs (less depth, fewer images).
- Add a recovery rule (the next day is lighter).
When an SLA is missed, don’t argue about effort. Notify the next owner and the content lead, re-forecast the publish date, and record the reason (waiting on input, scope change, unclear brief). If the same stage slips twice in a month, adjust the SLA or the workload.
Step-by-step: from idea to publish
A workflow works best when every stage has one owner, one output, and a clear “done” definition. Here’s a practical path you can repeat.
Steps 1 to 3: turn an idea into a usable draft
Capture and score ideas quickly. Write the one-line promise, the audience, and a rough score (impact, effort, urgency). Kill or park anything that doesn’t earn a slot.
Then write a brief that removes guesswork. Include the goal (what should change for the reader), the target reader, 3 to 5 key points, and a simple outline. Add any “must include” facts or sources.
Draft to a clear done definition: matches the outline, includes examples where needed, uses the right tone, and is ready for editing without missing sections.
Steps 4 to 6: make it publish-ready
Edit in two passes. The first pass is structure (flow, missing points, repetition). The second pass is polish (clarity, grammar, headlines, formatting).
Create and approve images with a specific request: what you need (for example, one hero image and two in-article visuals), what sizes, and what each image is meant to communicate.
Then do a final QA, schedule or publish, and announce it where your audience already is.
Templates that reduce back-and-forth
A workflow gets easier when everyone writes from the same set of templates. The goal is fewer clarifying questions mid-draft, fewer “small fixes” at the end, and faster approvals.
One-page content brief
Keep the brief to one page. Include only what prevents rework:
- Working title + one sentence on what the reader will get
- Target reader + their main problem
- Primary keyword (if SEO matters) + a few related terms
- Angle and constraints (what to include, what to avoid)
- Call to action and where it should appear (top, middle, end)
When this is complete, the writer shouldn’t need another meeting to start.
Outline + style basics
An outline template speeds up drafting and makes editing less personal. A simple structure is enough: hook, 3 to 5 sections, a concrete example, and a close.
Back it up with a short style guide that settles common disputes: tone (friendly, direct), paragraph length (1 to 3 sentences), heading capitalization, number formatting, and how you treat product names and acronyms. The most important choice is still the same: decide what “done” looks like.
Editing checklist + naming conventions
A consistent edit is more valuable than a perfect edit. Reviewers should be able to apply a checklist quickly:
- Does the draft match the brief and reader problem?
- Is there one clear point per section?
- Are claims specific (examples, numbers) rather than vague?
- Is formatting consistent (headings, bullets, capitalization)?
- Is the CTA clear and placed as requested?
Prevent asset chaos with naming rules. For example: YYYY-MM-DD_topic_slug_v1 for drafts and topic_slug_hero_1200x630_v2 for images.
Image creation and approvals
Treat images like part of the draft, not decoration. Start the image plan as soon as the outline is agreed, then produce the first visuals after the first edit pass. That timing avoids building polished graphics for paragraphs that later get cut.
A simple rule: the writer (or content owner) requests images, and one person approves them. If too many people “sign off,” you get endless tweaks and late publishing.
Before anyone opens a design tool, write a clear request. It saves time and reduces rework:
- Placement and purpose (hero, in-section, social)
- Format and size (file type, pixel dimensions, aspect ratio)
- Subject and mood (what must be shown, what to avoid)
- Brand cues (colors, typography, illustration vs photo)
- SEO basics (file naming, where alt text should point)
Keep the review loop short. Aim for one primary reviewer and no more than two rounds: first for “is this the right concept?” and second for “final polish.” If it’s still not right after that, change the request, not the pixels.
Alt text and captions should be owned by the writer, with a quick editor check. The writer knows what the section is saying, so they can write alt text that matches the page intent instead of vague descriptions.
If you can’t get the perfect image in time, choose a low-risk fallback: a clean branded illustration, a simple chart, or no image for that section. One strong hero image is better than three weak ones.
Pre-publish QA and quick checklist
A fast QA pass is where good drafts become safe, clear, and ready to ship. It also protects your team from small mistakes that cost trust: shaky claims, confusing headings, or a post that looks fine on desktop but breaks on mobile.
Start with truth and clarity. If a post makes a claim, make sure you can point to something you can verify (a report, a product doc, a real customer quote you have permission to use). If you can’t verify it quickly, rewrite it as opinion or remove it.
Then do one clean sweep for structure and basic SEO. You don’t need fancy tricks here: one clear title, logical headings, and consistent terms are usually enough. Watch for contradictions like promising a 24-hour SLA in one section and 48 hours in another.
Here’s a quick checklist you can run in 10 minutes:
- Facts and claims are verifiable (or rewritten)
- Title matches the topic and headings make sense
- Readability: short sentences, simple words, no wall-of-text sections
- Accessibility: descriptive headings and meaningful alt text
- Publish readiness: category/tags set and a quick mobile preview
Common workflow mistakes (and how to avoid them)
Most content schedules fail for boring reasons: nobody knows who owns the next step, feedback keeps looping, and “quick” requests land at the last minute.
Here are five patterns that quietly break your calendar:
- Ownership is vague. Name one stage owner for each step (idea, draft, edit, visuals, publish).
- Reviewers multiply. Keep it to one editor for quality and one approver for business sign-off.
- Editing turns into rewriting. Lock the brief first, then define edit as clarity, structure, and accuracy.
- Images are requested too late. Start image work when the outline is approved.
- SLAs ignore capacity. Set timelines you can actually meet with your current people.
Example: a simple weekly publishing rhythm
A small team can ship one solid post in 5 business days if handoffs are clear and feedback is time-boxed.
- Day 1 (Mon): Brief. Owner delivers a one-page brief by noon. Writer confirms scope by end of day.
- Day 2 (Tue): Draft. Writer delivers a complete first draft by late afternoon (whole draft, not partial).
- Day 3 (Wed): Edit. Editor returns one consolidated edit plus a short note: “must change” vs “nice to have.”
- Day 4 (Thu): Rewrite + images. Writer finalizes copy. Designer delivers one hero image and one social crop.
- Day 5 (Fri): QA + publish. Publisher formats, checks metadata, does a mobile scan, then schedules or publishes.
Feedback happens twice: on the brief and on the edited draft. After the edit stage, feedback stops unless it’s factual or legal/compliance.
“Done” at publish time means final copy approved in one place, title and meta description set, images sized correctly, basic QA passed, and the CTA confirmed.
Next steps: run the workflow and improve it
Pick one workflow and run it for a month before changing anything. Start with the simplest version that still protects quality: clear stage names, one owner per stage, and one place to leave feedback. Add steps only when you can point to a real problem (missed publish dates, repeated rework).
Measure a few things that show where time and effort are going:
- Cycle time (idea approved to publish)
- Revision rounds per piece
- Publish rate (planned vs shipped)
- Blockers count (how often work waits on a handoff)
- Time spent in each stage (draft, edit, images, QA)
Hold a short monthly retro with the people who touched the work. Keep it practical: what slowed you down, what was unclear, and what you can remove. Leave with one or two changes to test next month.
Automation is worth it when the task is repetitive or consistently delayed. Start small: brief templates, outline helpers, first-draft generation, standard image sizes, alt text suggestions, QA prompts, and localized versions for your top markets.
If you want to reduce manual steps without changing your process, GENERATED (generated.app) can support drafting, content polishing, translations, blog image generation, and even CTA generation with performance tracking, while you keep the same owners, stage gates, and QA standards.
FAQ
What’s the simplest way to set up a repeatable content workflow?
Start by naming a small set of stages you can repeat: brief, outline, draft, edit, visuals, QA, publish. For each stage, write one sentence for what “ready” means and who owns the next move. Keep early steps lightweight and tighten rules closer to publishing so work doesn’t stall.
What’s the difference between an owner and an approver in a workflow?
Ownership means one person is responsible for moving a stage forward; approval means one person can say “yes” or “no.” If a stage has multiple “owners,” it usually becomes nobody’s job, and deadlines slip. If approval is shared by a group, feedback tends to conflict and drag on.
How many reviewers should a blog post have?
A useful default is one quality owner (the editor) and one business owner (the strategist or requester), with clear boundaries. Let broader feedback happen on the brief and first draft, then narrow late-stage changes to facts, compliance, or broken formatting. That rule prevents endless revision loops.
How do we define “done” so handoffs don’t break?
Treat “done” as a gate with a short checklist, not a feeling. For example, a draft is “ready for edit” only when it matches the brief, has complete sections (no missing chunks), and includes placeholders with named owners for any missing inputs. If something is unclear, stop the handoff until the requirement is met.
How should we label versions so people don’t get confused?
Use a consistent version scheme tied to decision points, like v0.5 for first full draft and v1.0 for approved to publish. Add a short handoff note each time explaining what changed, what’s still open, and who must review by when. That reduces backtracking and prevents people from editing the wrong file.
What are realistic SLA timings for a weekly publishing cadence?
Set SLAs based on real capacity and include review time, not just creation time. A common weekly rhythm is 2–3 business days for drafting, 1 day for editing, 1 day for images, and a few hours for QA and scheduling. If you keep missing one stage, adjust the workload or the SLA instead of hoping it improves.
How should we handle rush requests without breaking the calendar?
Make rush a policy with tradeoffs, not an informal favor. Allow rush only if a lower-priority piece is paused, define what “rush” means (same day or 24 hours), and name the person who can approve the swap. After the rush, plan a recovery window so the team doesn’t accumulate burnout and errors.
When should we request images during the workflow?
Start the image plan as soon as the outline is approved and produce first visuals after the first edit pass. That timing prevents designing for sections that later get cut or reshaped. Use a clear request that states purpose, sizes, and what the image must communicate so the designer isn’t guessing.
How do we keep image approvals from dragging on?
Aim for one primary reviewer and no more than two rounds: first for concept, second for final polish. If it’s still wrong after that, rewrite the request (purpose, message, constraints) rather than nitpicking details. Also decide in advance who approves visuals so feedback doesn’t multiply.
What should we check in the final QA before publishing?
Run a quick pass for truth, structure, and publish readiness: verify claims or rewrite them, ensure headings match the promise, and check mobile formatting. Confirm alt text and metadata are present and consistent with the page intent. A short QA gate catches small issues before they turn into credibility problems.