Content pipeline with an API: a step-by-step architecture
Build a content pipeline with an API from idea to publish: generation, review, approval, scheduling, and monitoring, with a simple architecture you can adapt.
What problem a content pipeline solves
A content pipeline is the set of steps that takes an idea from "we should publish this" to a live page. It usually includes drafting, editing, metadata, images, approvals, and publishing. When the pipeline is clear, everyone knows what happens next and work does not disappear into chat threads.
Most teams do not lose time on writing alone. They lose time on the small, repeated tasks around it: copying text between tools, waiting for feedback, fixing formatting, checking headline length, adding alt text, uploading images in the right sizes, and scheduling posts. The same mistakes also repeat because the process lives in people’s heads.
An API-based pipeline turns those repeated tasks into predictable requests between systems: your CMS, your backend, and services that generate or validate content. That does not mean publishing without oversight. It means the boring parts happen by default (draft creation, formatting, metadata suggestions, image variants, status updates), while humans control what goes out.
A practical definition of "automatic" looks like this:
- Drafts can be generated and prepared automatically, but publishing happens only from an approved status.
- Rules are enforced by default (required fields, SEO basics), but editors can override when needed.
- Changes are logged automatically, but final sign-off stays human.
This approach pays off when you publish frequently, reuse content in multiple places, or want consistent output across authors. If you publish rarely and the process is already simple, manual publishing can be faster.
Example: a small marketing team writes product updates in a headless CMS. One person drafts, another edits, and a third handles images and scheduling. With an API workflow, a new draft can be created from a template, filled with suggested metadata, and paired with resized image variants automatically. The editor then focuses on accuracy, clarity, and voice.
The basic stages and roles
An API-driven pipeline works best when everyone uses the same few stages. You want enough structure to avoid chaos, but not so much that publishing turns into status meetings.
Most teams end up with five stages:
- Brief (what to write and why)
- Draft (first version)
- Review (quality, brand, and factual checks)
- Publish (schedule and go live)
- Measure (see what worked and what didn’t)
Each stage should have a clear owner and produce specific data for the next stage.
Who does what
Roles can be job titles or just hats people wear. What matters is that one person is accountable at each step.
A simple split:
- Requester: defines topic, audience, goal, and constraints (tone, length, must-include points).
- Editor: improves clarity and structure, checks SEO basics, flags missing info.
- Approver: signs off on accuracy, legal, brand, or product claims.
- Publisher: schedules, adds metadata, and pushes to the site.
CMS vs backend service
In this setup, the CMS is where content lives and where humans work: drafts, comments, approvals, and publishing fields. The backend service is the automation layer: it calls generation APIs, applies rules, stores logs, and moves items through statuses.
A useful mental model: the CMS is the source of truth for the article, and the backend is the traffic controller.
Across stages, a few things must move reliably: the brief, the article text, SEO fields (title, description, keywords), assets (image prompts and final image IDs), ownership (who is assigned), and status timestamps for tracking.
Example: a requester submits a short brief in the CMS. The backend picks it up, generates a draft and suggested metadata, and returns everything to the CMS for editing. After approval, the publisher schedules it. Later, the backend records performance so the next brief can be more specific.
Define your content model and statuses
Automation works best when every piece of content is a predictable object, not a loose document. Before you automate generation, review, and publishing, decide what fields you store and what "done" means at each step.
Start with one content object that can travel through your system. Keep it simple, but complete enough that an editor can review it without hunting for missing details.
A practical set of fields:
- Title and slug (or URL key)
- Outline (headings and key points)
- Body (full article content)
- Images (prompts, alt text, final image IDs)
- Metadata (description, tags, target keyword, canonical, author)
Statuses are the other half of the model. They should be plain-language, mutually exclusive, and tied to permissions. A common set:
- Draft
- In review
- Approved
- Scheduled
- Published
Treat status as a contract between humans and automation. Generation tools can write into Draft, but only an editor (or a defined approval rule) should move it to Approved. Scheduling should store a publish_at time and allow changes until it goes live.
Revision history keeps automation safe. Store a revision ID for every meaningful change, along with who made it and why. A useful record includes: previous value, new value, editor ID, timestamp, and an optional note like "fixed factual claim" or "updated meta description." If you use a generation tool like GENERATED, store the generation request ID as well so you can trace which prompt and settings produced the text.
Finally, add IDs and timestamps everywhere. Each content item needs a stable content_id plus created_at, updated_at, and published_at. This avoids "which version did we approve?" debates and makes audits straightforward.
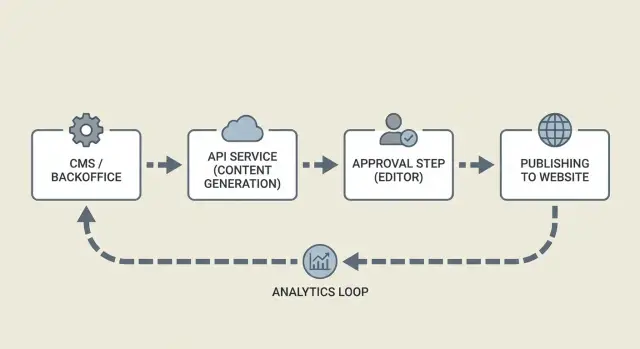
Architecture overview: services and how they talk
A reliable pipeline splits the work into small services that pass clear messages. That keeps your CMS clean, makes failures easier to retry, and keeps humans focused on approvals.
At a high level, you usually have four parts:
- Generator service: receives a brief and returns a draft plus suggested title, headings, and metadata.
- Approval UI: where editors read, comment, request changes, and approve.
- Publisher worker: takes approved content, updates the CMS, then schedules or publishes.
- Tracking store: records what happened (success, errors, timestamps) and later captures performance signals.
How services communicate matters more than which tools you use. Webhooks or a queue are common so slow steps (generation, image rendering, CMS publishing) do not block the UI. The generator should respond with an ID, and every step after that should refer to the same ID.
A simple flow: the backend creates a content request, the generator returns a draft, an editor approves it, and the publisher confirms the CMS result. Between each step, store a status so you can resume cleanly after a crash.
What data moves between services
Keep payloads small and predictable. For example:
- A brief (inputs) plus a content model (required fields)
- Draft content plus editor change notes
- A publish instruction (publish now vs scheduled time)
- A publish receipt (CMS entry ID, slug, warnings)
Tracking and feedback loops
Tracking is more than analytics. It is your audit trail.
If publishing fails because a required CMS field is missing, record the exact error and move the item to "Needs fixes." If performance later shows low clicks, trigger a focused revision request (for example, test a new title and meta description).
Example: a marketing team queues 20 product FAQs. Drafts are generated overnight, editors review in the morning, and the publisher worker schedules them. The log shows 18 succeeded and 2 failed because a category mapping was missing, so those two get routed back for a quick fix.
Step-by-step: build the pipeline end to end
A good pipeline is less about auto-writing and more about moving the same piece of content safely from idea to publish, with clear handoffs and a paper trail.
Start with a brief you can reuse
Before any API call, create a brief template. Keep it short so people actually fill it in, but structured enough that the generator does not have to guess.
A solid brief usually includes:
- Topic and the single question the post answers
- Target reader (what they already know)
- Tone (friendly, neutral, opinionated)
- Target length and format (how-to, glossary, news)
- Required SEO inputs (primary keyword, location, product names)
Store the brief in your CMS or database so every draft is traceable back to a request.
Generate, validate, review, publish
Once the brief is saved, your backend calls the content generation API and stores the returned draft as a new content item with a clear status (for example, "Draft generated"). Save both the inputs you sent and the full response so you can reproduce the result later.
Before a human sees it, run quick automated checks. This is often where teams save the most time.
Keep the checks practical:
- Required fields exist (title, description, slug, tags)
- Obvious duplicates (same topic, same slug, near-identical intro)
- Formatting rules (headings present, paragraphs not huge, banned phrases)
- Basic SEO sanity (no keyword stuffing, headings match the content)
- Image requirements (a prompt exists or an asset is selected)
Then route the draft to the right reviewer automatically. Product posts can go to a product owner; sensitive topics can go to a dedicated queue.
When a reviewer approves, lock the version. Freeze the exact text and metadata that will ship, while allowing new versions for future edits.
Finally, publish or schedule. Record outcomes like publish time, CMS entry ID, and later performance signals. If you generate CTA variants, store which one shipped so you can compare results over time.
Set up review and approval without slowing down
A good review flow is about fast decisions with clear reasons and a paper trail you can trust.
Editors move faster when they can see what changed, comment in context, and send focused change requests without rewriting the whole brief. If you support multiple rounds, make the system carry the context.
Decide what can be auto-approved
Not every piece needs the same level of scrutiny. Save human attention for what can hurt your brand.
A practical rule set:
- Auto-approve low-risk fixes like spelling, formatting, and minor metadata tweaks.
- Require editor review for new articles, new claims, or major rewrites.
- Require subject review for medical, legal, finance, or safety advice.
- Require brand review for sensitive tone or naming.
- Require fact checks when the content includes numbers, comparisons, or quotes.
Enforce these rules with gates in your CMS status model. For example, a generated draft can move from "Draft" to "Needs review" automatically, but only an editor role can push it to "Approved."
Handle multiple rounds without chaos
Treat each revision as a new version and keep approvals tied to a specific version.
A pattern that scales:
- Lock the approved version while edits happen on a new revision.
- Attach comments and change requests to a specific version.
- Set a maximum of two review rounds before escalating to a quick live discussion.
- Track who approved what, and when.
Example: a writer requests a rewrite after a product update. The generator produces a new draft. The editor reviews a diff showing only the affected sections, leaves two inline comments, and marks it as "Changes requested." The next version returns with the issues addressed and is approved quickly.
Publishing details: metadata, images, and scheduling
Publishing is where good drafts become pages people click and read. The details that matter most are metadata, images, and timing.
Metadata: decide what is generated vs edited
Pick one source of truth for each field. A common split: the brief sets intent, the generator suggests options, and an editor makes the final call on anything user-facing.
Handle these fields explicitly: title, slug, meta description, canonical (if needed), category/tags, author/date. Let the generator propose a few options, but store the editor’s chosen version as the publishable one. Keep internal notes (target keyword, angle, audience) separate from public metadata.
Images: treat them like content, not attachments
Images need their own mini-workflow. Store an image brief alongside the article brief, then generate, review, and publish with clear statuses.
A simple flow:
- Write an image prompt based on the article angle (plus brand rules).
- Generate a few options and select one.
- Resize to required sizes (hero, social, thumbnail) and compress.
- Write alt text that describes the image, not the keyword.
- Save credits or license notes (if you use them) and final file IDs in the CMS.
Publish format: Markdown, HTML, or CMS blocks
Choose a format that matches your rendering setup. Markdown is easy to store and review. HTML is direct but harder to edit safely. CMS blocks are great for complex layouts but add work for generators.
A common approach is to store Markdown, convert to HTML at publish time, and keep structured metadata (FAQ, key takeaways, product mentions) in separate fields.
Scheduling: time zones, embargoes, and backfills
Scheduling breaks when time zones are vague. Store publish_at in UTC, store the editor’s time zone separately for display, and log schedule changes.
Embargoes are easier if you model them: content can be "approved" but blocked from going live until the embargo ends. For backfills (older posts you are migrating), keep an original_published_at field so you show the right date without breaking sorting or analytics.
Example: an editor approves a post on Friday, schedules it for Tuesday 09:00 America/New_York, and sets an embargo until a product announcement. The pipeline can keep it ready and only flip the final status to "Published" when both conditions are met.
Common mistakes and traps to avoid
An API pipeline can feel automatic right up until the day it quietly publishes something broken. Most failures are not about the model or the CMS. They are about missing guardrails.
A common trap is partial publishing. The CMS post gets created and indexed, but the hero image job fails or the metadata step times out. Readers land on a half-finished page and your team cleans it up by hand. Treat publishing like a single release: validate required fields, confirm assets are ready, then publish.
Another trap is unclear ownership. If approval is shared but nobody is accountable, drafts pile up. Name one owner per content item and give them a clear "approve" or "request changes" step.
Regeneration is also easy to misuse. If you regenerate after an editor has made changes, you can overwrite real edits. Lock or snapshot the approved version, and only allow regeneration in a specific status such as "Draft" or "Needs rewrite."
Issues that show up often:
- Publishing without "all checks passed" gates (images, canonical URL, schema, categories).
- No single approver, or approval rules that are not written down.
- Regenerating at the wrong time and replacing editor updates.
- Creating new posts without checking for similar topics (keyword cannibalization).
- Skipping QA on titles, slugs, and meta descriptions.
Safeguards that prevent real pain: keep a lightweight topic registry to spot duplicates early, add a final QA step that checks title length and required metadata, and make the publish operation safe to retry so a temporary failure does not create double posts.
Quick checklist before you hit publish
Small misses turn into big annoyances: wrong slug, missing metadata, or a draft that was never truly approved. A short checklist keeps the pipeline reliable when you are publishing at volume.
Content readiness:
- Confirm a brief exists (audience, goal, and the action you want readers to take).
- Confirm you are publishing the newest approved version (version ID and status match).
- Review title and slug for readability and uniqueness.
- Check the search snippet: the meta description should be specific and match the promise of the post.
Technical publish checks:
- Validate images: correct sizes, sensible file names, and descriptive alt text.
- Run the publish job and store the success response (CMS entry ID, final slug).
- Confirm scheduling details, including time zone.
- Confirm measurement tags are attached before the post goes live.
Example: if an editor approves version 7 but the pipeline publishes version 6, everything looks fine until someone spots the wrong paragraph in production. Fix this by checking approved version ID and status in the same step that triggers publishing.
Example workflow and practical next steps
Picture a small marketing team that wants to publish consistently without spending half the week copying between tools. They keep a backlog of topics in their CMS and aim for five drafts per week. The goal is a pipeline that turns a brief into a draft, routes it for review, and schedules it with the right metadata.
One article end to end:
- Brief created: a marketer adds a topic, audience, keywords, and notes in the CMS.
- Draft generated: a worker picks up the brief, calls the generation API, and saves the draft as "Needs review."
- Editor review: the editor edits in the CMS and approves or requests changes.
- SEO and assets: title, meta description, and alt text are checked; an image is attached.
- Scheduled publish: the post is scheduled for a specific time and moved to "Scheduled."
If the editor requests a rewrite, do not overwrite the draft blindly. Create a new revision with a clear reason (for example, "tone too salesy" or "missing example"), then re-run generation using the editor’s notes as constraints. Keep both versions so you can see what changed and avoid repeating the same mistake.
After publishing, logging turns "we think it worked" into clear next actions. Track a few signals for every post: time from brief to publish (and where it got stuck), rewrite cycles, organic impressions and clicks, CTA views and conversions (if you use CTAs), indexing status, and publish errors.
Next steps: start small. Automate draft creation and status changes first, then add images, scheduling, and performance tracking. Once the basics are stable, expand to translations and faster indexing.
If you want to keep the integration surface small, GENERATED (generated.app) can act as the API layer for generating and polishing text, producing blog images, and generating CTA variants with performance tracking, while your CMS remains the source of truth for approvals and publishing. It also supports multi-language workflows and faster indexing options like IndexNow, which fits naturally once your pipeline is already tracking statuses and publish events.